In this Raspberry Pi Fail2ban tutorial, we will be showing you how to set up and configure the Fail2ban software on your Raspberry Pi.
Fail2ban is a crucial piece of software when it comes to improving the security of your Raspberry Pi. It is especially useful if you have your Raspberry Pi publicly accessible via the internet as it is an active and learning form of defense.
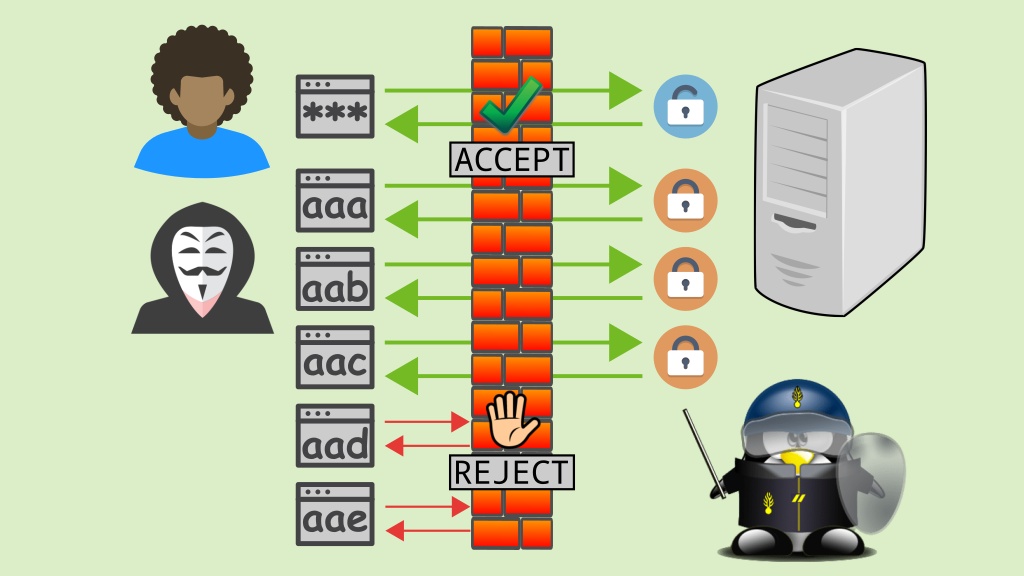
For those who do not know what Fail2ban is, it is a piece of software that attempts to block malicious connections to your device, which in our case is our Raspberry Pi. It is important if you have SSH or even a web server that is publicly accessible.
Fail2ban works by continually scanning your log files and looking for signs of potential attacks. These include attacks such as too many password failures as well as scanning for exploits and much more. Once it finds unusual activity it then automatically updates your firewall to ban that IP address.
Equipment
You will need the following equipment for this tutorial on setting up Fail2ban on your Raspberry Pi.
Recommended
Raspberry Pi
Micro SD Card if you’re using a Raspberry Pi 2, 3 or B+
Power Supply
Ethernet Cord (Recommended)
Optional
Raspberry Pi Case
USB Keyboard
USB Mouse
Installing and configuring Fail2ban
1. Before we get started with installing Fail2ban to our Raspberry Pi, we should first ensure that it is entirely up to date.
We can do this very simply by running the following commands within the terminal on the Raspberry Pi.
sudo apt-get update
sudo apt-get upgrade
2. With the Raspbian operating system now up to date, let’s go ahead and install the Fail2ban software by running the following command on the Raspberry Pi.
sudo apt-get install fail2ban3. During the installation process, fail2ban will generate a file called “jail.conf“.
We need to make a copy of this file and name it “jail.local“, fail2ban will automatically detect this file and load in its configuration for it.
Let’s copy the file by running the following command on the terminal on the Raspberry Pi.
sudo cp /etc/fail2ban/jail.conf /etc/fail2ban/jail.local4. Now let’s go ahead and open up the file that we just copied and take a look at the default configuration that Fail2ban loads in with.
Open up the file using the nano editor by running the following command on your Raspberry Pi.
sudo nano /etc/fail2ban/jail.local5. Within this file use the CTRL + W key combination to search for “[sshd]“, it should look like the text that we have displayed below.
[sshd]

port    = ssh
logpath = %(sshd_log)s
backend = %(sshd_backend)s
6. Now to enable this section and to set the SSHD filter we need to add the two lines below the “[sshd]” text that we found in the previous step.
enabled = true
filter = sshd
The first line that we are adding to this configuration file enables Fail2ban to process those rules for the specified port.
The second line tells Fail2ban that it needs to use the “/etc/fail2ban/filter.d/sshd.conf” file to filter connections to the ssh port.
7. In addition to being able to enable it and setting the filter, we can also change what Fail2ban does when someone triggers the filters.
To set the ban action you can utilize the following line. In our example that we have below, we will be using the “iptables-multiport” ban action.
This action will ban the user that triggered the filter and restrict them from accessing any ports on the device.
banaction = iptables-multiportYou can find additional actions by checking out the /etc/fail2ban/action.d/ folder, typically though you will want to block an attacker on all ports.
8. In addition to being able to set the ban action, you can also set the number of attempts a user gets before they are banned as well as how long that they should be banned for.
To do this we can utilize the following two values, we have set some example values that we will explain below.
bantime = -1
maxretry = 3
The first line above (“bantime = -1“), sets how long you want the user to be banned for. This value needs to be in seconds, for example, 1800 seconds will ban the user for 30 minutes.
If you want to ban the user indefinitely, you can set this value to -1 as we have in our example above.
The second line (“maxretry = 3“), defines how many tries the user gets before the ban action is run. In our example, we set this to 3 meaning the user will have 3 chances before they are banned from accessing the device on all ports.
9. Once you have finished configuring the [sshd] section with a ban action, ban time, max retries as well as enabling it and setting the filter you should end up with something like we have below.
[sshd]
enabled = true
filter = sshd
port = ssh
banaction = iptables-multiport
bantime = -1
maxretry = 3
logpath = %(sshd_log)s
backend = %(sshd_backend)s
10. When you are happy with your changes, go ahead and save the file by pressing CTRL + X then Y and finally ENTER.
11. You should now have the Raspberry Pi Fail2ban up and running successfully. To get the Fail2ban software to load up your changes on your Raspberry Pi you need to go ahead and enter the following command.
sudo service fail2ban restartApache & Nginx Web Servers
You can protect your Apache or Nginx web server using Fail2Ban as well. The setup is very similar to what we did for SSH. I will quickly go through an example for Apache below.
1. If you want to enable protection for Apache against bad bots, then you will need to open the jail local file.
sudo nano /etc/fail2ban/jail.local2. Locate the section called [apache-badbots], you can use CTRL +W to find it.
3. Under this header, add the following two lines.
enabled = true
filter = apache-badbots
The filter name will typically be the same name as the module unless you’re using a custom configuration file. So, [apache-badbots] will have a filter name of apache-badbots.
You can find all the filter configuration files in the following directory, use ls to list all the files.
ls /etc/fail2ban/filter.d/4. Once you’re done editing the jail.local file, save the file by pressing CTRL + X then Y and finally ENTER.
5. Lastly, remember to restart Fail2Ban on the Raspberry Pi whenever you make a change.
sudo service fail2ban restartI hope from this Raspberry Pi Fail2Ban tutorial that you have learned how to setup and configure the software. I also hope that it has shown the benefits of utilizing a piece of software such as Fail2Ban.
If you have any feedback on this tutorial on setting up and configuring the Fail2Ban on your Raspberry Pi, then feel free to post a reply below.
Comments
Post a Comment